A new window will appear asking for an instance ID and a date. Scan in the instance barcode from the printed room instance sheet, or type in the instance ID manually, then enter the date the results were exposed. The date must be entered in the format dd/mm/yyyy, or alternatively, clicking the calendar icon to the right of the field will bring up a calendar and allow a date to be selected.
Once both fields have been filled, the 'Create' button should turn highlight in Green to indicate that the form can now be submitted.
If the instance entered has been set up to be a ‘sessional’ instance (i.e. This plate location will be exposed more than once per day) It will now ask you to enter the session number. Enter the session number and press ‘Ok’. If the instance is not sessional this will not appear.
The system will now ask for how many plates have been sent from the customer. Enter the value and then press ‘OK’.
Note: If MRS detects a discrepancy between the number of plates you enter here, and the number of Plates you prepare in the next step, you will be asked to enter a comment explaining why this is when you come to save the Book In.
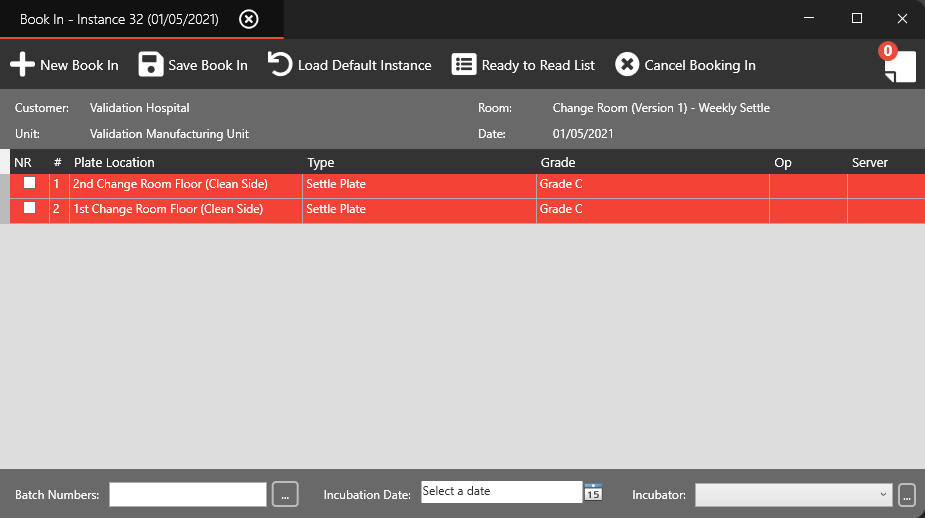
You will now see a table in the book in form with all the plates available to the room instance.
There will be more options along the top; ‘Save Book In’, ‘Load Default Instance’, and ‘Cancel Booking in’.
The notes button at the top right will now also be available to the user. This is where the user can enter a note to send down the chain. This could be to report damage to a plate or an issue with the paperwork. The customer will see these notes when the result is released.
As well near the top of the form is the details for the room instance, what customer, unit and room they belong to, along with the date of exposure.
The table in the middle is colour coded to indicate the status of a plate. Each plate at first will be red, indicating that it is not complete and need attention before the book in can be saved. Gray indicates that a plate is marked as ‘No Record’ or ‘NR’. Lastly green indicates that the plate is on the book in and ready to be saved.
If the Plate is to marked as 'No Record' tick the 'NR' checkbox for the relevant plate, otherwise, click the blank field under 'Op' and 'Server' to select the operator and server for each plate.
If you have a large instance, there are a couple of keyboard shortcuts available that you may find useful to speed up filling in these details:
Duplicate Operator and Server to Plate below (Ctrl + D) Enter the Operator and Server for the currently selected plate, and then (with the line still selected) use this shortcut to duplicate the Operator and Server to the plate below.
Duplicate Operator and Server to all Subsequent Plates (Ctrl + F) Enter the Operator and Sever for the currently selected plate and then (with the line still selected) use this shortcut to duplicate the Operator and Server to all subsequent plates in the instance.
The fields below the table of plates must be filled before the Book-In can be saved:
Batch Numbers Click the three dots (...) button and enter in the Batch Numbers of any Media used in the Book-In.
In the window this brings up, these can be entered freely within the top field however MRS will auto-suggest any applicable Batch numbers it finds present within the 'Media' section as you type. Select the Plate type this applies to and select the plus (+) button to add the batch number to the current Book In.
Incubation Date Enter the date on which the Plates within the current Book In will be incubated.
Incubator Click the three dots (...) button and select (or add) the Incubator in which the Booked-In plates will go and click the 'Save' button.
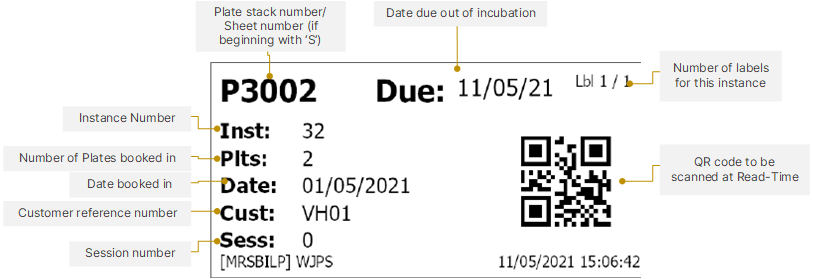
Click the Save Book In button and you should receive confirmation of a successful Save. MRS will also print out labels for the Plate Stack (1 label for every 10 plates) and 1 label to be stuck to the Book-In sheet.
The printed labels are laid out as follows:
This completes the Book-In process and MRS is now ready to process another Book-In, and will take you back to step 2 above. You can now either process another Book-In, or click 'Cancel' if you are finished with this process.

 to the right of the field will bring up a calendar and allow a date to be selected.
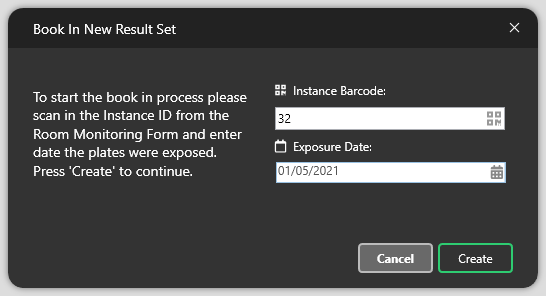
 will now also be available to the user. This is where the user can enter a note to send down the chain. This could be to report damage to a plate or an issue with the paperwork. The customer will see these notes when the result is released.
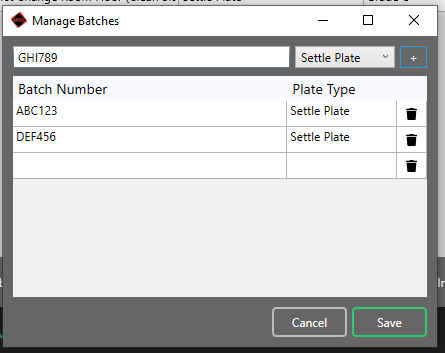
 and you should receive confirmation of a successful Save.